DocsYour library
Cast and World
Cast & World is where you keep the people, places and things your videos return to, so a character looks the same in shot one and shot ten. Real people need a photo, your consent and a face check.
What you will make
A saved item you can call by name in any project: @meera, a person with the same face every time; a pet; a mascot; a tea shop; a brass lamp. Studio, Movie and Film, Avatar and Business all take items from the same cast. The cast belongs to the project you are working in, so each project has its own people and places.
An actor from start to finish
Say you want a lead for the monsoon story.
- Open Cast & World in the menu. The right panel lists this project's items under Cast & World (2). In the middle is the stage.
- Pick the kind above the prompt box: Person, Pet, Creature, Anime, Product, Place or Prop. Choose Person.
- Use the Wizard, which asks three things in turn (Who, Look, Views) and writes the prompt for you, or press Write my own to edit the words yourself.
- Optionally press Face photos and add pictures of the face from several angles, from the camera or your Vault. The button counts them.
- Look at Render sheet · 0.35 cr. The price follows the picture model beside it. Press it. Studio draws a character sheet: three full-body views on top, a 2×2 grid of close-ups below.
- Press Save person, type a Name and a tag (the tag is what you type in prompts, such as @meera), and save.
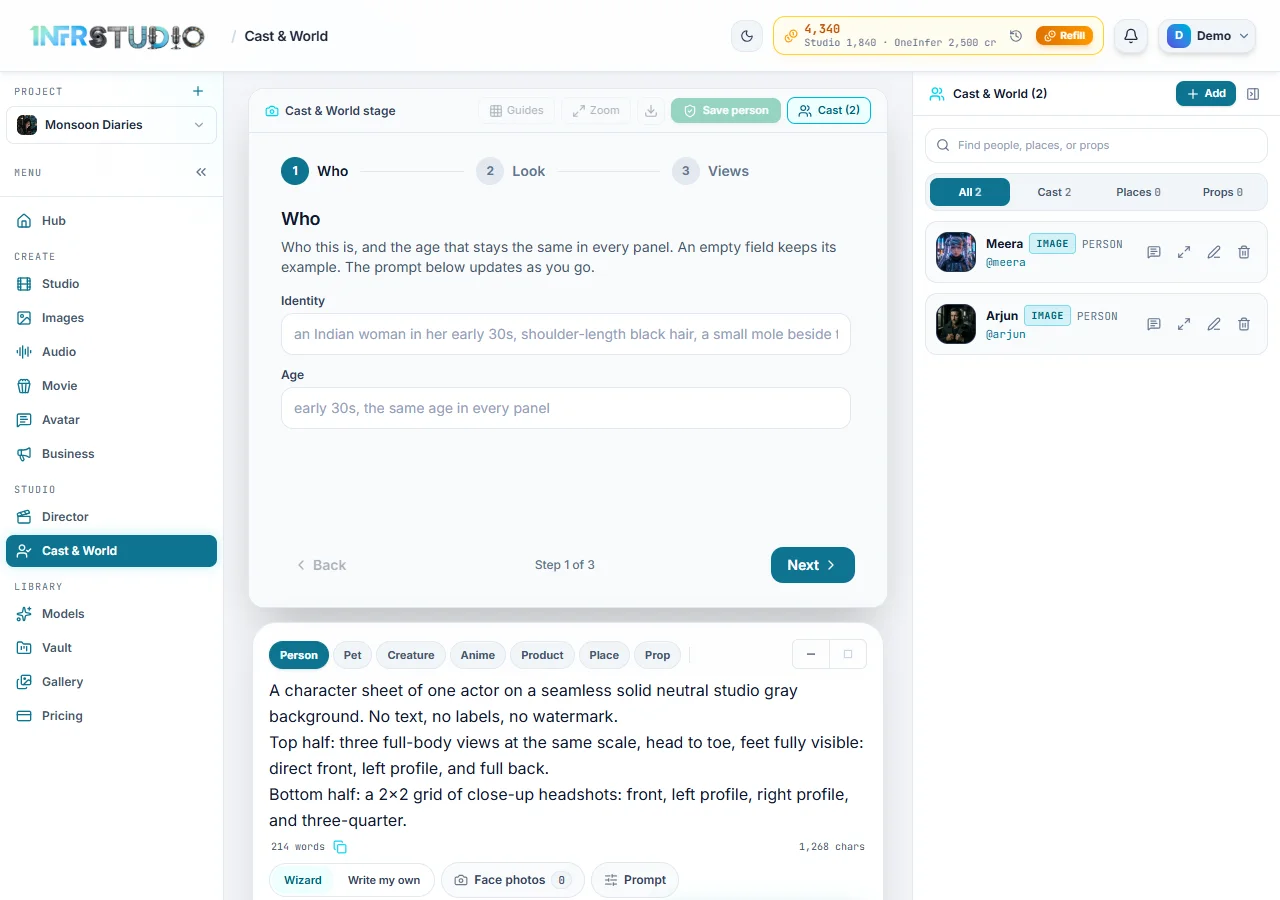
The saved item shows in the right panel with its picture, its tag and its kind. Its buttons are, left to right, make a talking video of it (opens Avatar), view its pictures large, Edit and Delete. Above the list, All, Cast, Places and Props filter it, and Find people, places, or props searches by name.
Adding an item without a sheet
Press Add at the top of the right panel for a quicker way. It asks for:
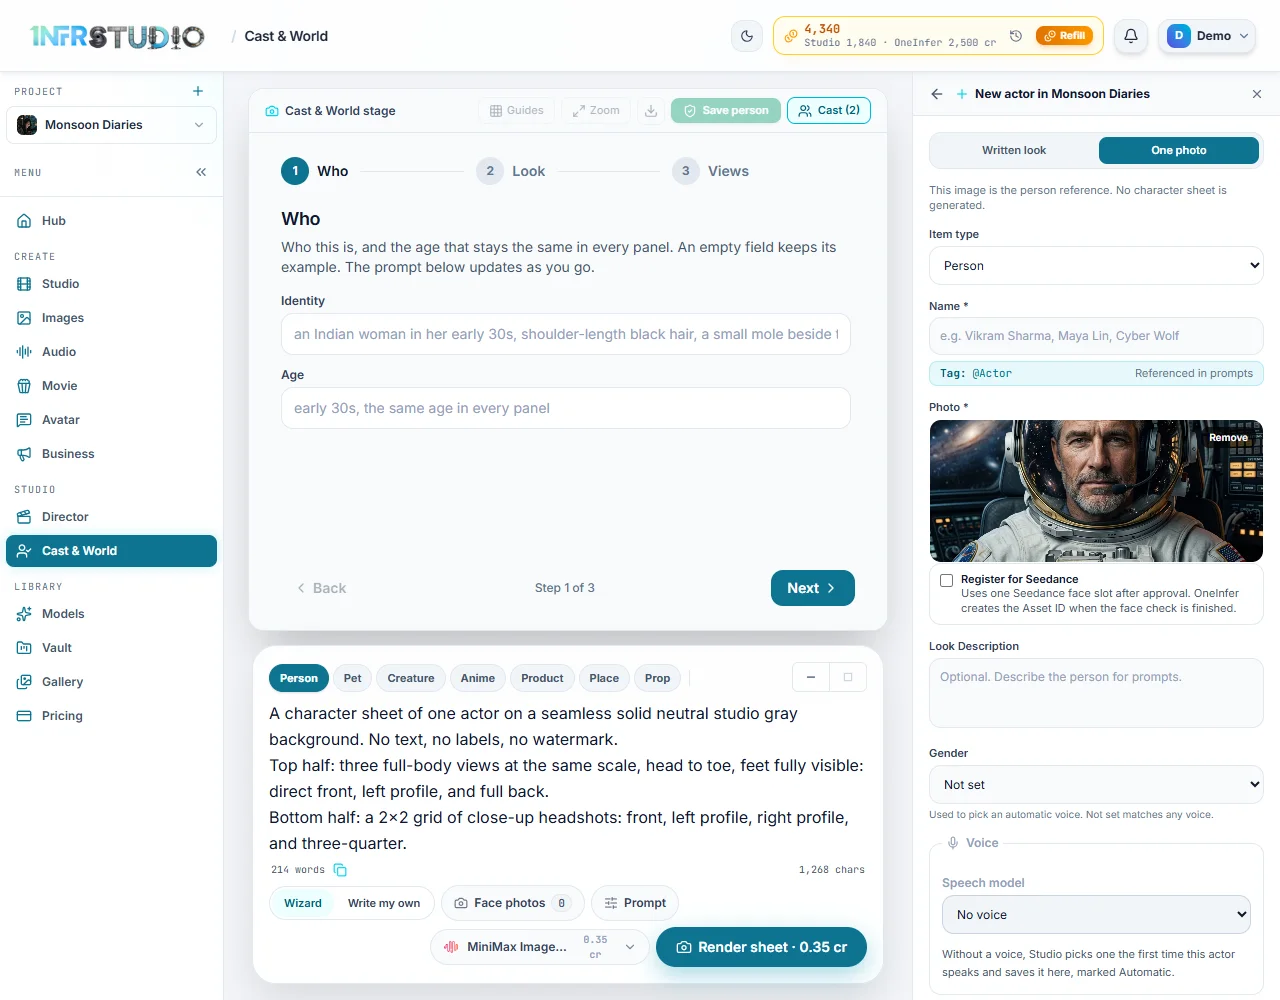
- Written look or One photo. A written look is saved as a reusable description, and no picture is made. A photo is saved as the reference, and no sheet is made.
- Item type: Person / illustrated character, Pet / animal, Creature / mascot, Place, Scene or Prop / product.
- Name and the Tag it makes from it (@Name).
- Look Description, which is the details that must stay the same.
- For a person: Gender, which is used to pick an automatic voice.
Voices
People, pets and creatures can have a voice. In the Voice part of the form, choose a Speech model (or No voice), then a Voice, and for models that take one, the language under Speaks. Press Make the sample to hear a Sample line in that voice. It costs about 1 credit and is saved to your Vault. The models and prices are the ones on the Audio page.
A saved voice is used in place of the video model's own wherever this actor speaks in Studio and in Movie. With No voice, Studio picks one the first time the actor speaks, saves it, and marks it Automatic.
Places and props
Choose Place or Prop for somewhere or something that must stay the same: the tea stall, a bottle with its label. These take photos of the place or object (the button is called Photos instead of Face photos) and a written look. Studio passes them to the model as references, so they come back looking alike.
Real people, consent and the face check
Some video models use a real person's face only after it has been checked. Studio asks for this when you save a Person from a photo.
- Add the photo. OneInfer's content safety system checks it as it uploads. The box reads Checking photo… meanwhile.
- Choose how the photo is used. Register for Seedance sends an accepted photo to Seedance and uses one of your Seedance face places. Leave it unticked and the photo is saved for the other models; Seedance does not receive it.
- If you register, you must tick the box certifying that you have the legal authorization and consent of the person to make AI content with their likeness. The box cannot be ticked until a photo is added. Impersonation and unauthorized likenesses are not allowed, and you carry the responsibility for how it is used.
- Save. The actor shows Pending while OneInfer reviews the portrait. You get an email when it is accepted or refused.
- When it is approved, the actor shows a link, Open the Seedance face check. It works once and lasts 30 minutes. Finish the short face check there. OneInfer then creates the Asset ID and emails you that the actor is ready.
If a portrait is refused, the note says why, and saving the actor again sends a new review. Only a person's own pictures, or pictures you have the right to use, belong here.
How many real faces you can keep registered depends on your plan, and each is kept for a period: Starter 1 (7 days), Pro 5 (48 hours), Team 15 (7 days) and Scale 30 (30 days). The number of actors, places and props you can save is not limited. See Credits and plans.
Questions
Do I need to render a sheet to make an actor?
No. Press Add, choose Written look or One photo, and save. A sheet gives a model more angles to keep the face the same, but it is optional.
Can I use my own photo?
Yes, if you have the right to. Choose One photo, and see Real people, consent and the face check.
Does an actor work in every project?
Each project has its own cast. Open the project you want, and make or add the actor there.
How do I use an actor in a clip?
In Studio, type @ and a name in your prompt, or press Add to shot and pick from Cast, Places and Props. In Movie and Film and Business, pick them from the cast list.