DocsMake videos
Director
Director is the timeline editor. Put clips from Studio, Movie or your own uploads in order, add sound, and export one finished video. The export price is shown before you press Render.
What you will make
One finished video, cut from the clips in your project: a reel from three shots, a film with a voice-over and music, a vertical ad with a close-up laid over the main picture. Studio, Movie and Business make the pieces; Director joins them. The video you export is saved to your Vault.
A cut from start to finish
Say you have three clips of the monsoon story and a voice line.
- Open Director in the menu. The project you are in is shown at the top left; Director edits that project's timeline.
- On the left, the Media tab lists this project's clips, pictures and sound under Your media. Press the + beside a clip to put it on the timeline. It lands at the start of the selected lane (or the last video lane), at its real length. Add the second and third the same way, and drag them into order.
- Press Play in the player, or move the playhead along the ruler.
- Click the small diamond where the second clip begins and choose Crossfade and 0.5s.
- Open the Audio tab on the left to make a voice line, or the Music tab for a track. Both land on their own lanes.
- Press Export Video. The window shows the length and the price, for example Render 16s · 8 credits. Press it and wait for Render ready.
What you will see
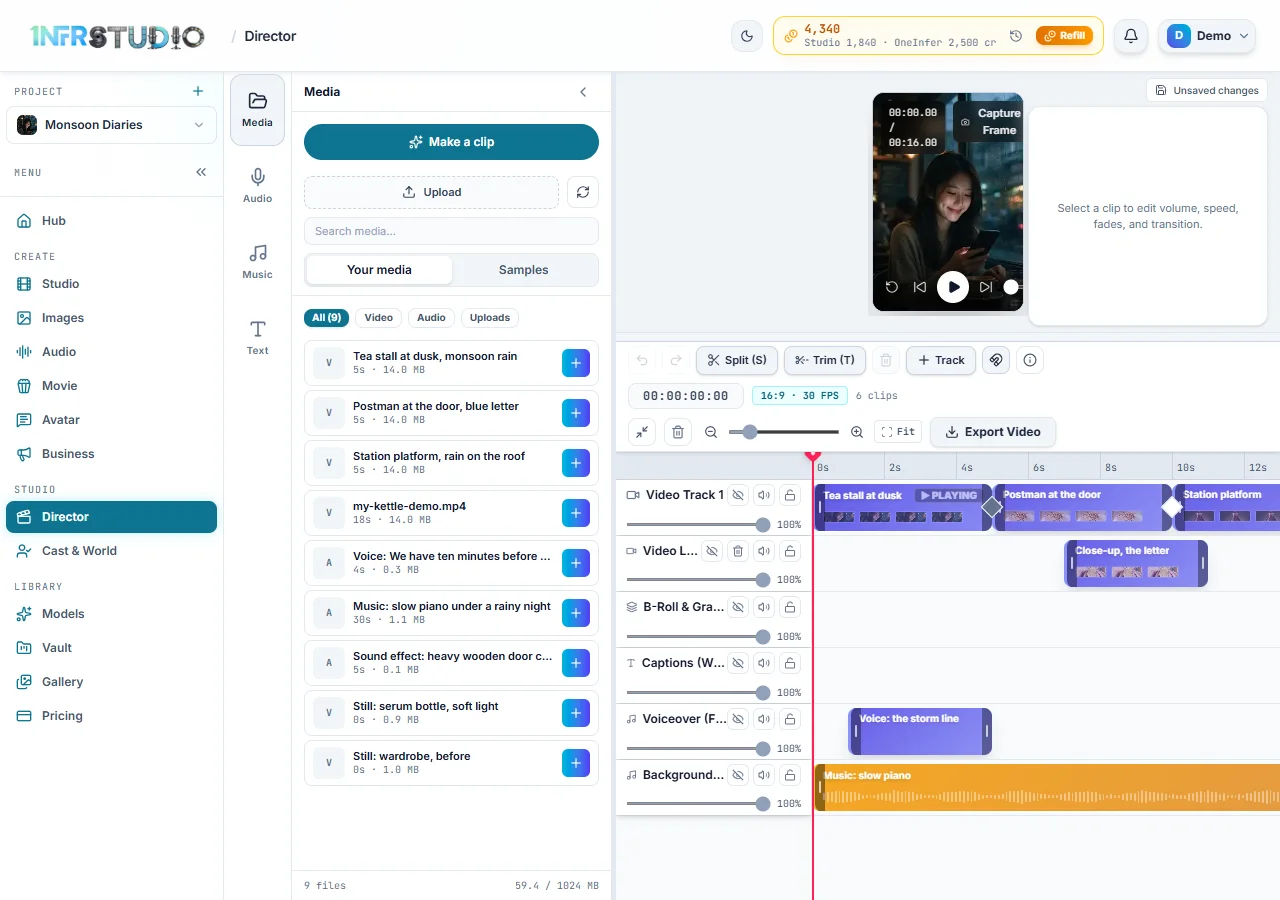
On the left, a strip of four tabs: Media, Audio, Music and Text (captions). Press a tab to open its panel and press it again to hide the panel. Make a clip at the top of Media opens Studio, and what you make there lands in this project's media.
Top right of the player area is a save line (Saved on this device, All changes synced, or Unsaved changes). Under the player is the timeline:
| Control | What it does |
|---|---|
| Undo and Redo | Ctrl+Z and Ctrl+Shift+Z. |
| Split (S) | Cuts the selected clip in two at the playhead. |
| Trim (T) | Cuts the selected clip's end at the playhead. |
| Track | Adds a lane: Video lane, Overlay / B-roll, Audio / music or Captions. A timeline holds up to 12 lanes. |
| Snapping (the magnet) | Snapping on or off. |
| The info button | Timeline keyboard shortcuts. |
| Fit and the zoom slider | Zoom the timeline. Fit shows the whole film. |
| Export Video | Opens the export window. |
Right-click a clip for Trim end to here, Split here, Split at playhead, Duplicate, Copy, Detach audio and Delete. Detach audio puts a video clip's sound on its own lane so you can lower or mute it.
Adding media and uploads
The Media tab has Your media and Samples, a search box (Search media…) and filters All, Video, Audio and Uploads.
Press Upload to add your own file. Director takes MP4, MOV and WebM video and MP3 and WAV sound; anything else is refused with a message saying so before it is sent. Pictures are not uploaded here: add them to your Vault and they appear in the list. You must be signed in to upload.
A file over 1 MB shows a notice, Uploading with its name and size, a progress bar and a Cancel button. At 100% it says Sent. Reading its length and sound… while Studio reads the real length, and then the file is listed at the top with its + button. If the file is too big, the message says so and suggests a shorter clip or a smaller export.
When you add a clip whose shape differs from the film's, a notice tells you which edges will be cut off to fill the frame, and offers Make the film 9:16 (or the clip's own shape) in one press. See Shape and fit.
Trimming, splitting and transitions
- Trim an end by dragging the clip's edge, or park the playhead inside the clip and press Trim (T) to cut the end there. Split (S) makes two clips at the playhead; press Delete to drop the right-hand piece.
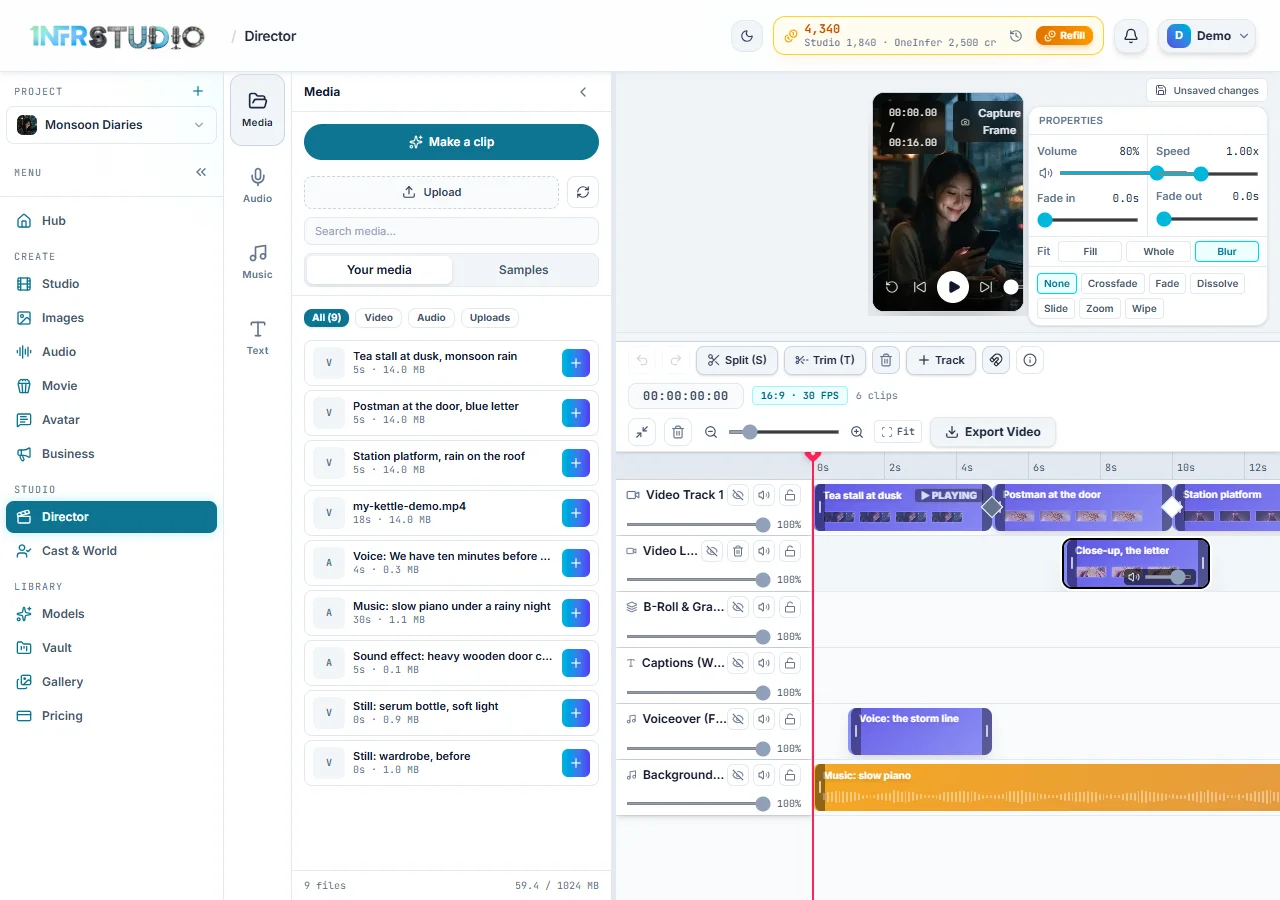
- Select a clip and the panel beside the player shows Volume, Speed (0.25 to 2), Fade in and Fade out (up to 3 seconds).
- Incoming transition, on a picture clip, is how that clip comes in: None, Crossfade, Fade to black, Dissolve, Slide, Zoom or Wipe, for 0.25s, 0.5s (the default), 0.8s or 1.2s.
Shape and fit
The film's shape is set when you make the project (16:9, 9:16, 1:1 or 4:5) or with Make the film on a clip of another shape (it also offers 21:9, 4:3 and 3:4). A clip of another shape needs a rule for the spare room. Select the clip and choose Fit in frame:
| Fit | What it does |
|---|---|
| Fill | Fills the frame. The default. A picture of another shape loses its edges. |
| Whole | Shows all of it, with black bars. |
| Blur | Shows all of it on a blurred copy of itself. |
The export matches the viewer. If clips will be cropped, the Export window says how many, and offers Show them whole on a blur.
Video lanes
A film is not limited to one picture. The first video lane that is not hidden is the film. Every picture lane after it is drawn over the film wherever it has a clip: a Video lane covers the frame and its sound plays with the film's; an Overlay / B-roll lane sits in its own box and is silent. The later the lane in the list, the higher it is drawn.
Each lane has three buttons next to its name:
- Mute silences the lane's sound, but its pictures still show.
- Hide track (the eye) takes the lane out completely, picture and sound. Hidden lanes are listed under Hidden, and Show track brings one back.
- Lock stops edits to its clips.
Each lane also has a volume slider. The built-in lanes cannot be removed, only hidden. Lanes you add have Remove track.
Exporting
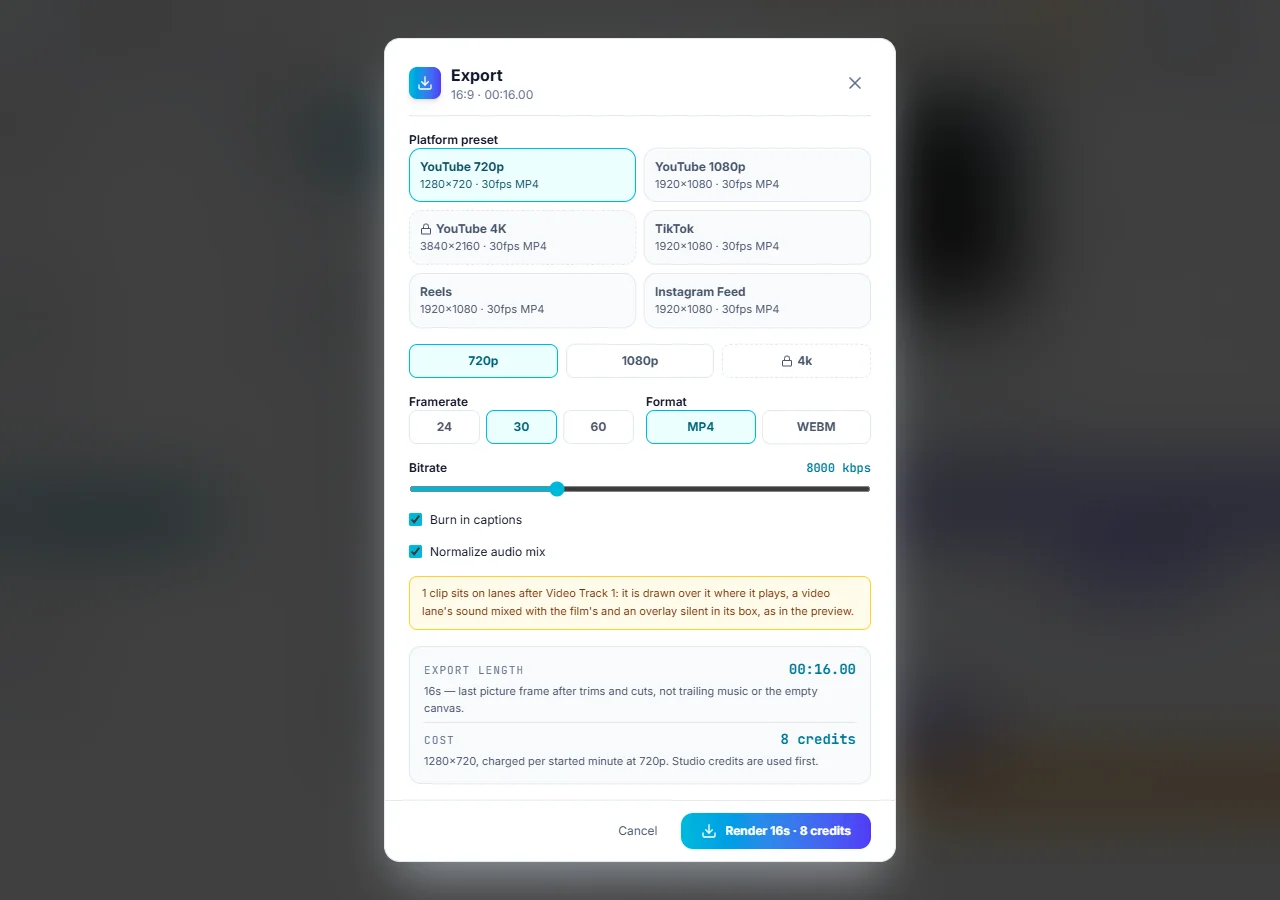
Press Export Video. The window has:
- Platform preset: YouTube 720p, YouTube 1080p, YouTube 4K, TikTok, Reels and Instagram Feed. A preset sets the size and the shape. If the film is another shape, the window says so, shows the size you will get, and offers Make the film 9:16 (or the preset's shape).
- 720p, 1080p and 4k, locked with a padlock above your plan's limit: Starter exports up to 720p, Pro up to 1080p, Team up to 4K, Scale up to 4K uncompressed. Starter exports carry a Studio watermark.
- Framerate (24, 30 or 60, 30 by default), Format (MP4 or WEBM), Bitrate (2,500 to 20,000 kbps, 8,000 by default), Burn in captions and Normalize audio mix, both on by default.
The frame follows the film's shape and the resolution. A 16:9 film at 1080p is 1920×1080; a 9:16 film is 1080×1920. A 21:9 film at 1080p is 2520×1080, a 4:3 film is 1440×1080 and a 3:4 film is 1080×1440. The window shows the exact size.
What it costs
An export costs credits for every minute you start, at the resolution's rate:
| Resolution | Credits per started minute |
|---|---|
| 720p | 8 |
| 1080p | 15 |
| 4K | 35 |
So a 16-second film at 720p is 8 credits, a minute and a half at 1080p is 30, and a three-minute film at 4K is 105. The length counted is up to the last picture frame, not trailing music. Studio's price list also has 480p at 4 credits a minute, but the Export window offers 720p, 1080p and 4K.
An export can be up to 5 minutes. For a longer film, trim it or export it in parts. When it is done the window says Render ready with Download, and the file is also saved to your Vault.
Questions
Will my clips keep their sound?
Yes. A video clip's own sound plays unless you mute the clip or its lane. A Video lane laid over the film adds its sound to the film's. A picture on an Overlay / B-roll lane has none.
What is the difference between muting a lane and hiding it?
Muting silences the lane but keeps its picture. Hiding removes both its picture and its sound from the preview and the export.
Why is 1080p locked?
Your plan limits the export size. Starter is 720p, Pro is 1080p, Team and Scale are 4K. See Credits and plans.
My export is over 5 minutes.
Exports stop at 5 minutes. Trim the film, or split it into two parts and export each.